Introduction
In most Power BI teams, moving a report (PBIX) from development to a production workspace is a manual job — someone opens the Prod workspace and re-publishes the report by hand. It’s slow, easy to get wrong, and leaves no record of what changed or who changed it.
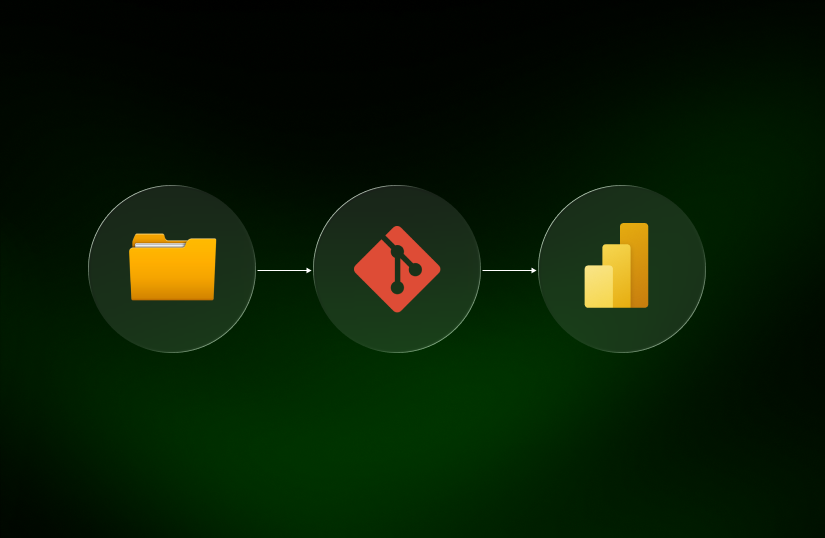
This blog shows a better way: a workflow that never requires a manual deployment from Dev to Prod. The path from a finished report to a live production report is fully automated, through five connected stages:
- PBIP — save the report in Power BI’s Git-friendly project format.
- Fabric Git integration (Dev) — the Dev workspace syncs its items to a dev branch in Azure DevOps.
- Pull request (PR) into `main` — changes are reviewed and approved before they can be promoted.
- The PR triggers an Azure DevOps pipeline — merging is the only action needed; nothing else is manual.
- The pipeline deploys automatically — azure-pipelines.yml runs deploy.py (fabric-cicd), authenticated with a Service Principal, to copy the approved items from Dev into Prod.
By the end you’ll have a workflow where every change is tracked, reviewable, and reversible; developers work in parallel without overwriting each other, and nothing reaches production without an approval — yet no one ever republishes by hand.
Throughout, we’ll walk through both the concept behind each piece (why it exists) and the hands-on build that brings the five stages to life.
Why CI/CD matters for modern BI teams
CI/CD stands for Continuous Integration and Continuous Deployment. Stripped of jargon, it describes three habits:
- Develop — build your solution, then save and commit it to a shared repository, so the repo always holds the latest version.
- Collaborate — use branches and reviews so multiple people can change things safely, merging only what’s approved.
- Deploy — let an automated service publish approved changes for you, instead of doing it by hand.
Together, these habits turn deployment from a risky manual to chore into a repeatable, reviewable process — one that scales to a team instead of depending on one person’s memory.
Why PBIP is the right format for CI/CD
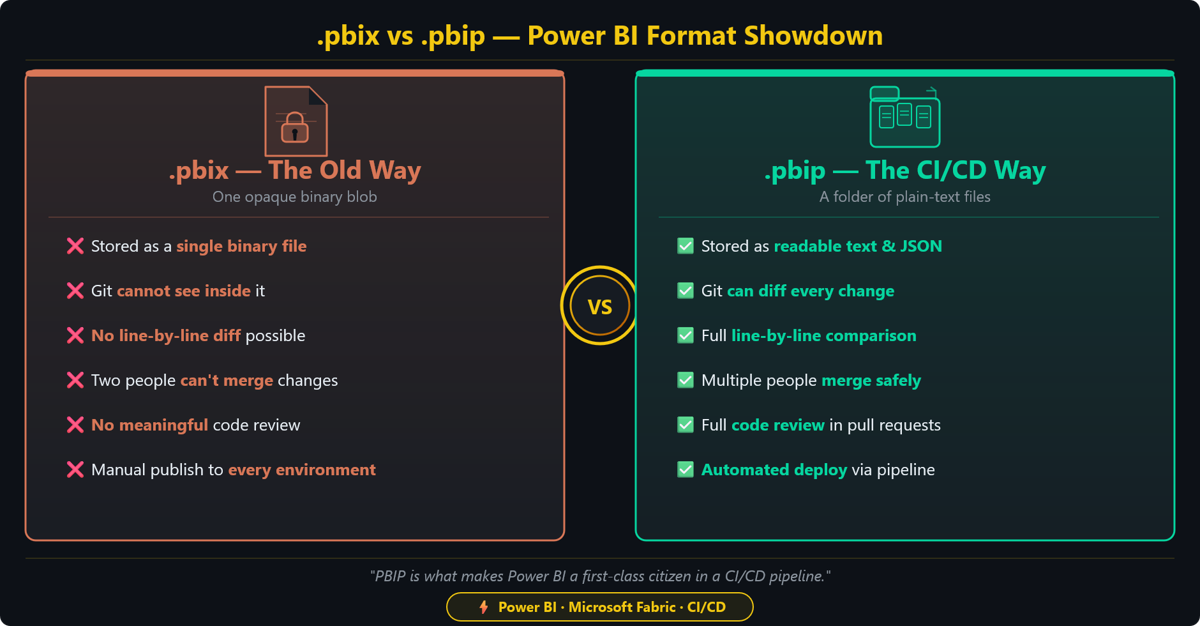
Source control and automation only work if your files are text — something a tool can read line by line, compare, and merge. This is exactly where the traditional Power BI format (PBIX) falls down.
A `.pbix` file is a single, opaque, binary blob. Git can store it, but it can’t be seen inside it. That means:
- You can’t see what changed between the two versions — only that the file is different.
- Two people editing the same .pbix can’t merge their work; one overwrites the other.
- There’s no meaningful code review, because there’s no readable “code” to review.
PBIP (Power BI Project) solves this. When you save a report as .pbip, Power BI writes it out as a folder of plain-text files instead of one binary blob. The report definition (the PBIR format) and the semantic model are stored as readable text and JSON.
How Fabric Git integration, Azure DevOps & fabric-cicd fit together
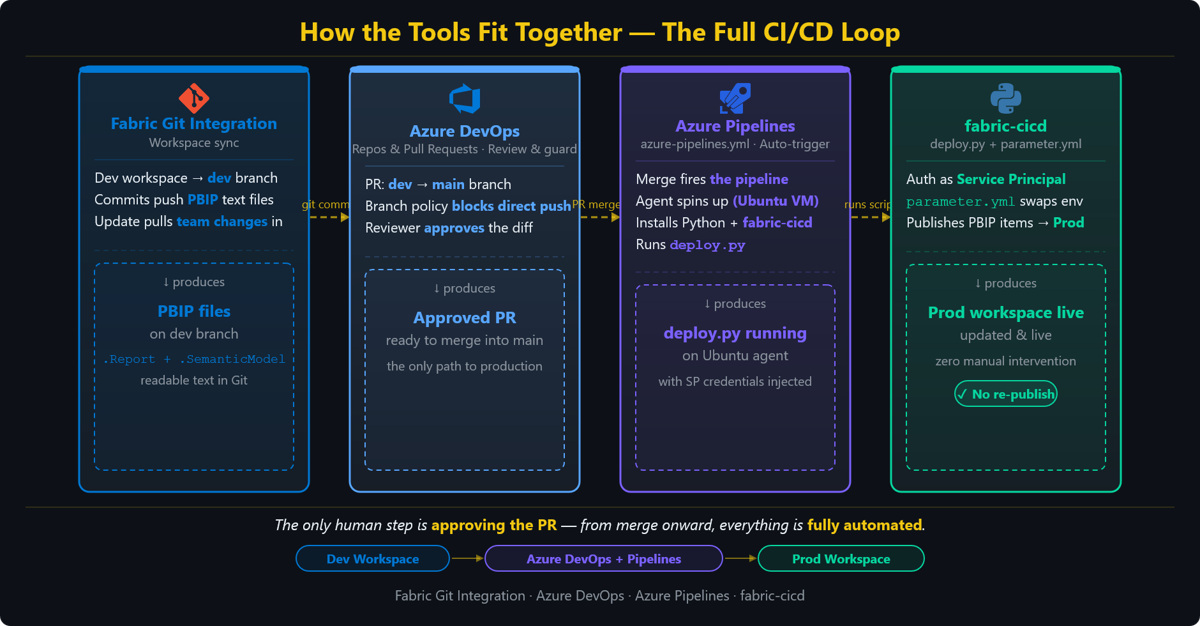
Three tools each play a distinct role. The trick is understanding what each one is for.
Fabric Git integration — your workspace, connected to source control
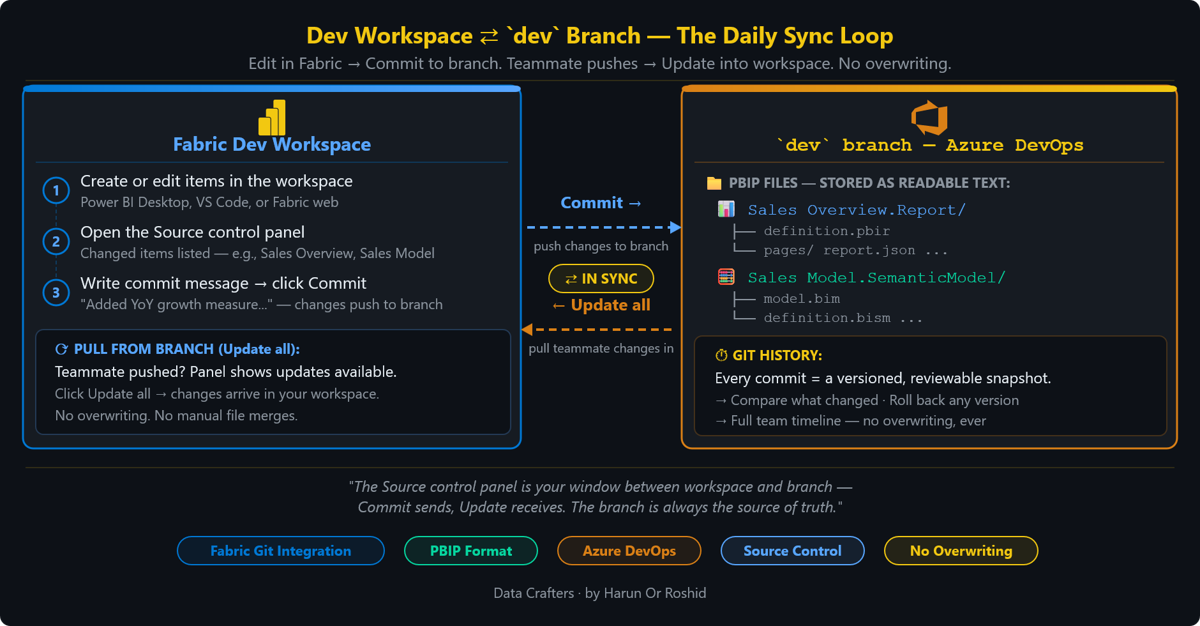
Microsoft Fabric lets you connect a workspace directly to a Git branch in Azure DevOps. Once connected, every item in the workspace (reports, semantic models, and other Fabric items) is exported as files into the branch. When you make a change in the workspace, Fabric shows it in a Source control panel; you commit, and it’s pushed to the branch. When someone else pushes a change, you click Update to pull it in.
What Git tracks — and what it doesn’t. Git stores the definitions of your items (the report layout, the semantic model, configuration), not the data. Lakehouse tables and uploaded files stay in OneLake. For a CI/CD pipeline of reports and semantic models, definitions are exactly what you want.
Azure DevOps — collaboration and orchestration
Azure DevOps gives you the Git repository itself, plus the machinery teams rely on branches to isolate work, pull requests (PRs) to propose and review changes, branch policies to require that review, and pipelines to run automation when something happens (like a merge).
Azure DevOps Pipelines — the automation trigger
A pull request is the human checkpoint; the Azure DevOps pipeline is what turns an approved PR into a live deployment with no further clicks. The pipeline is defined in a single file in the repo, `azure-pipelines.yml`, which acts as the conductor: it declares when to run (the trigger — a merge to main), where to run (a build agent, such as an Ubuntu VM), and the ordered steps — install Python, install fabric-cicd, then run the deployment script `deploy.py`. It also passes the Service Principal credentials to that script as environment variables. So the moment a PR completes, the YAML fires, an agent spins up, and deploy.py runs — nobody opens the Prod workspace by hand.
fabric-cicd — the deployment engine
fabric-cicd is the Python library from Microsoft that deploy.py calls to actually publish PBIP items into a target Fabric workspace. It authenticates as a Service Principal (a non-human identity with Admin access to Prod, so the deploy runs unattended) and publishes the items straight into that workspace. Everything it needs to reach Prod — the credentials and the target workspace ID — is handed to it by the pipeline as variables, so the same source files deploy correctly without any hand-editing.
Put together, the division of labor is clean:
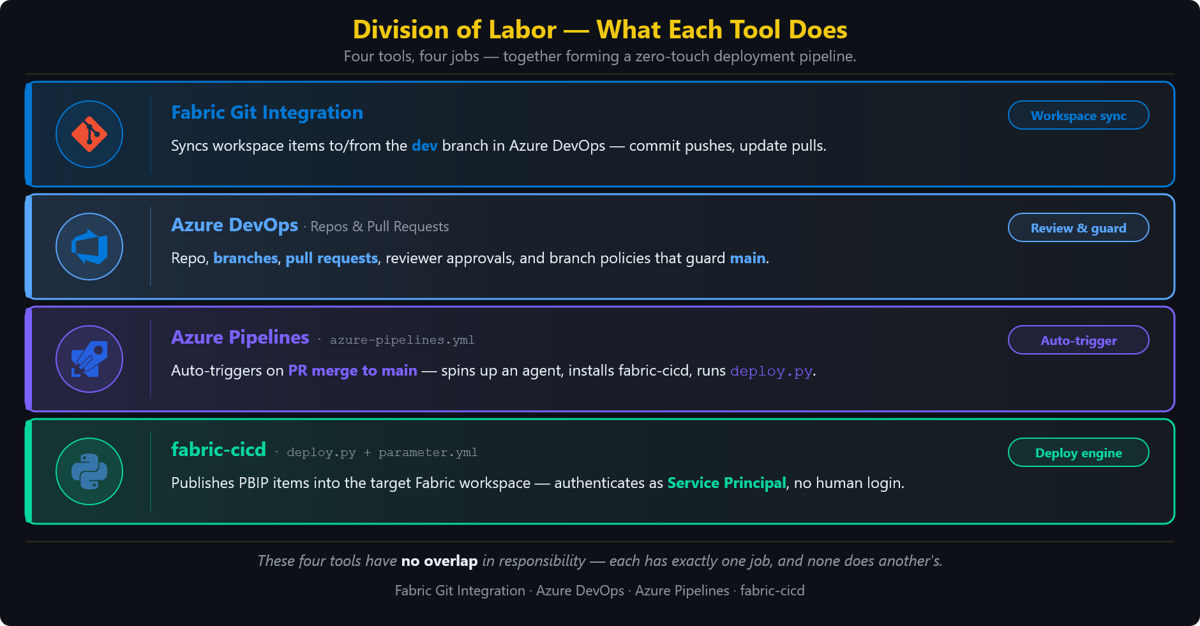
The build, step by step
Here is the exact flow we’re going to set up:
- You save a report as PBIP. Your Fabric Dev workspace is Git-integrated with the `dev` branch in Azure DevOps.
- You build in the Dev workspace; your items sync to `dev`.
- You open a pull request from `dev` → `main`, and a reviewer approves it.
- The moment it’s merged, an Azure DevOps pipeline triggers automatically — no further manual step.
- That pipeline runs fabric-cicd with a Service Principal (via deploy.py) and deploys your report into the Prod workspace.
Let’s walk through it.
Prerequisites & Service Principal setup
Tools you’ll need:
- Power BI Desktop (to author reports and save as PBIP)
- VS Code (for Git, and to edit the deployment scripts — if you work on the dev branch from your local machine)
- Git installed locally (if you work on the dev branch from your local machine)
- An Azure DevOps account and organizational access
- Python 3.9–3.12 (fabric-cicd’s supported range)
Permissions:
- Admin role on the Fabric workspaces you’ll deploy to (for you, the human, during setup).
Set up the Service Principal (the automation identity). A Service Principal (SPN) is an identity in Microsoft Entra ID that applications use to authenticate — no human login required. Our pipeline uses it so deployment can run unattended.
- In the Azure portal → Microsoft Entra ID → App registrations, register a new application. Note its application (client) ID and Directory (tenant) ID.
- Under Certificates & secrets, create a client secret and copy the value somewhere safe (you only see it once).
- In your Fabric Prod workspace, add the Service Principal with the Admin role so it’s allowed to deploy.
- Make sure your Fabric tenant allows service principals to use Fabric APIs (a tenant admin setting).
Connecting the Fabric Dev workspace to Azure DevOps
Step 1 — Save your report as a PBIP project. In Power BI Desktop, go to File → Save as, and choose the `.pbip` (Power BI Project) type. Power BI writes a folder containing a. Report folder (the visuals/layout) and a .SemanticModel folder (the model). These text files are what we’ll version.
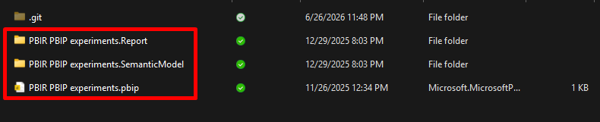
Step 2 — Create the Azure DevOps project, repo, and branches.
- In Azure DevOps, select or create an organization, then create a project.
- Go to Repos → Files and Initialize the repository (this creates main).
- Create a second branch named `dev` from main. We’ll develop on dev and promote to main via pull request.
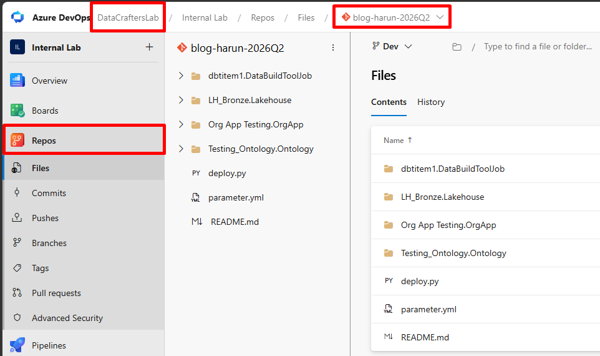
Step 3 — Git-integrate the Fabric Dev workspace with `dev`.
- Open your Fabric Dev workspace → Workspace settings (gear icon) → Git integration.
- Choose Azure DevOps, then select your Organization, Project, Repository, and set Branch to `dev`.
- Optionally set a folder in the repo (e.g. /workspace) to keep items tidy.
- Click Connect and sync.
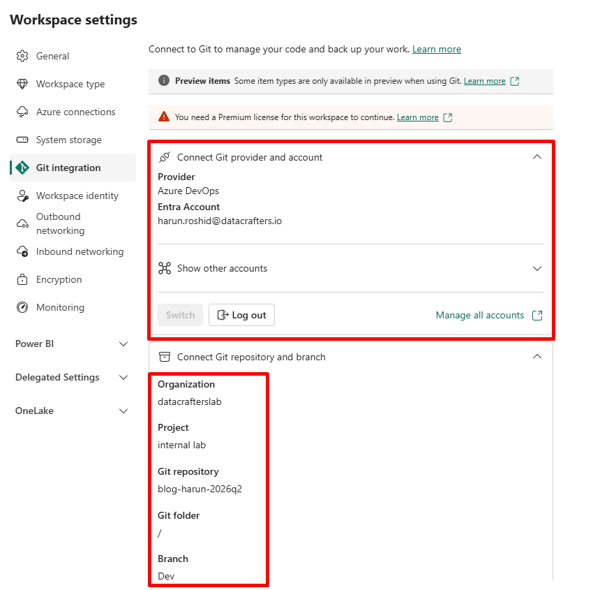
Fabric now synchronizes the workspace with the dev branch. Each item becomes a folder in the repo containing its definition of files — your reports and semantic models, now living as source code.
Developing in the Dev workspace & syncing to dev
With the workspace connected, day-to-day development looks like this:
- Create or edit items in the Dev workspace (or author in Power BI Desktop / VS Code and push the PBIP files).
- Open the Source control panel in the workspace. It lists everything you’ve changed — for example, two uncommitted changes: the Sales Overview report and the Sales Model semantic model.
- Write a clear commit message (“Added YoY growth measure and refresh the Sales Overview layout”) and click Commit.
Your changes are now pushed to the `dev` branch. If a teammate pushed something, the panel shows updates available — click Update to pull them into your workspace. This is how the team stays in sync without anyone overwriting anyone else.
Tip — feature branches for bigger work. For larger or riskier changes, create a feature/… branch from dev, connect a temporary feature workspace to it, build there, and merge back to dev when ready. It keeps work-in-progress isolated. For everyday changes, committing straight to dev is fine.
Pull request & review: dev → main
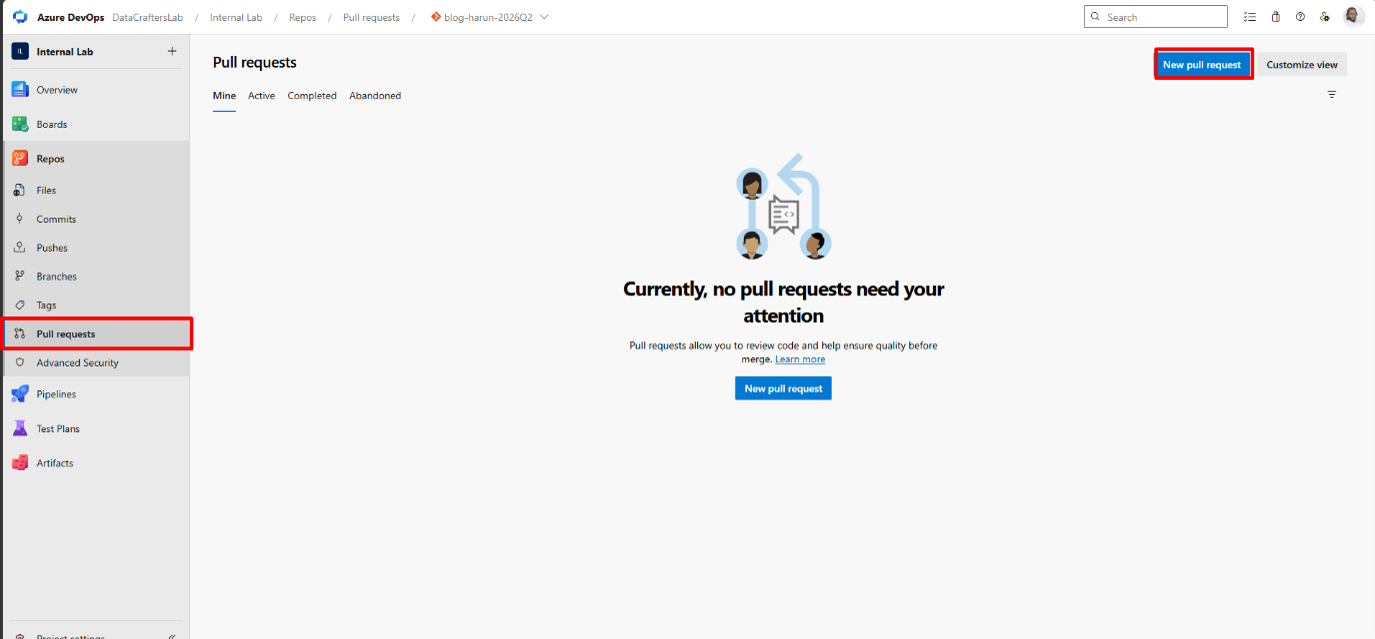
This is the gate that protects production. The main branch represents “what should be live,” and the only way into it is a reviewed pull request.
Step 1 — Require reviews with branch policy. In Azure DevOps, go to Repos → Branches → `main` → Branch policies and require a minimum number of reviewers (and, optionally, a successful build). This blocks anyone from committing directly to main — changes must arrive through a PR.
Step 2 — Open the pull request. When your work on dev is ready, create a pull request from `dev` into `main`. Describe what changed and why.
Step 3 — Review and approve. A teammate reviews the PR. Because PBIP files are texted, the reviewer can see exactly what changed — a renamed measure, a reworked page, a new data source. They approve, request changes, or comment. Nothing merges until the policy conditions are met.
Step 4 — Merge. Once approved, the PR is merged into the main. That merge is the trigger for everything that happens next — automatically.
Handling conflicts. If two people change the same item, the second merge will flag a conflict. The fix is routine: pull the latest main, resolve the difference, commit, and merge. Because the files are texted, conflicts are visible and resolvable — not a mystery binary clash.
The auto-triggered deployment pipeline
We want one thing: the moment a change lands in `main`, deploy it to Prod — with no human action. An Azure DevOps pipeline does this. It’s defined in a YAML file (azure-pipelines.yml) in the repo root and configured to trigger changes to `main`.
Here’s the pipeline. It installs Python, installs fabric-cicd, and runs our deploy script:
# azure-pipelines.yml  — place this in the repo root

trigger:

  branches:

    include:

      - main          # run automatically whenever main is updated (i.e. a PR merges)

pr: none              # deploy only on merge to main, not on PR creation

pool:

  vmImage: 'ubuntu-latest'

variables:

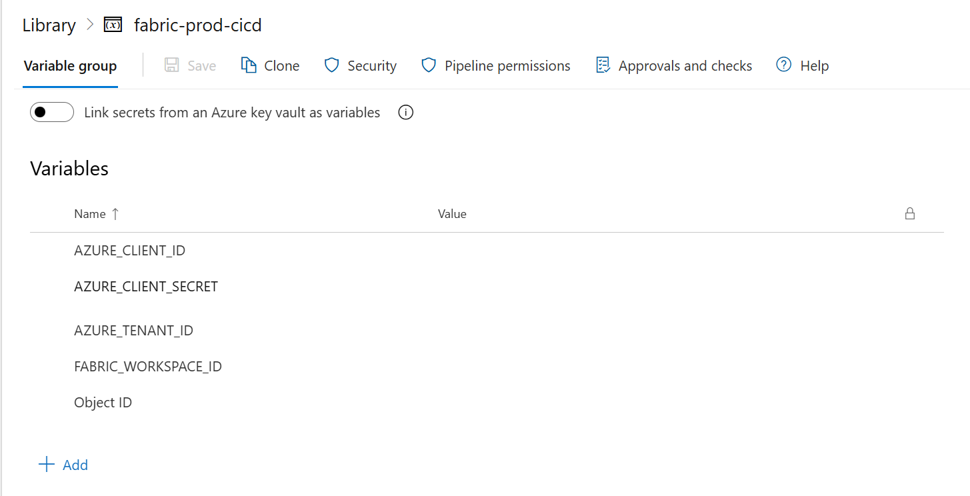
  - group: fabric-prod-cicd   # secured vars (SPN secrets + workspace id) from Pipelines -> Library

steps:

  - checkout: self

  - task: UsePythonVersion@0

    inputs:

      versionSpec: '3.12'

    displayName: 'Use Python 3.12'

  - script: |

      python -m pip install --upgrade pip

      pip install fabric-cicd azure-identity

    displayName: 'Install fabric-cicd'

  - script: python deploy.py

    displayName: 'Deploy PBIP items to Prod workspace'

    env:

      AZURE_TENANT_ID: $(AZURE_TENANT_ID)

      AZURE_CLIENT_ID: $(AZURE_CLIENT_ID)

      AZURE_CLIENT_SECRET: $(AZURE_CLIENT_SECRET)

      FABRIC_WORKSPACE_ID: $(FABRIC_WORKSPACE_ID)
The $(…) values come from a variable group (Pipelines → Library) named fabric-prod-cicd. It holds the Service Principal’s tenant, client, and secret (plus its object ID) and the target Fabric workspace ID. Mark the client secret and the IDs as secret, so they’re encrypted and never printed in logs.
The sequence, end to end:
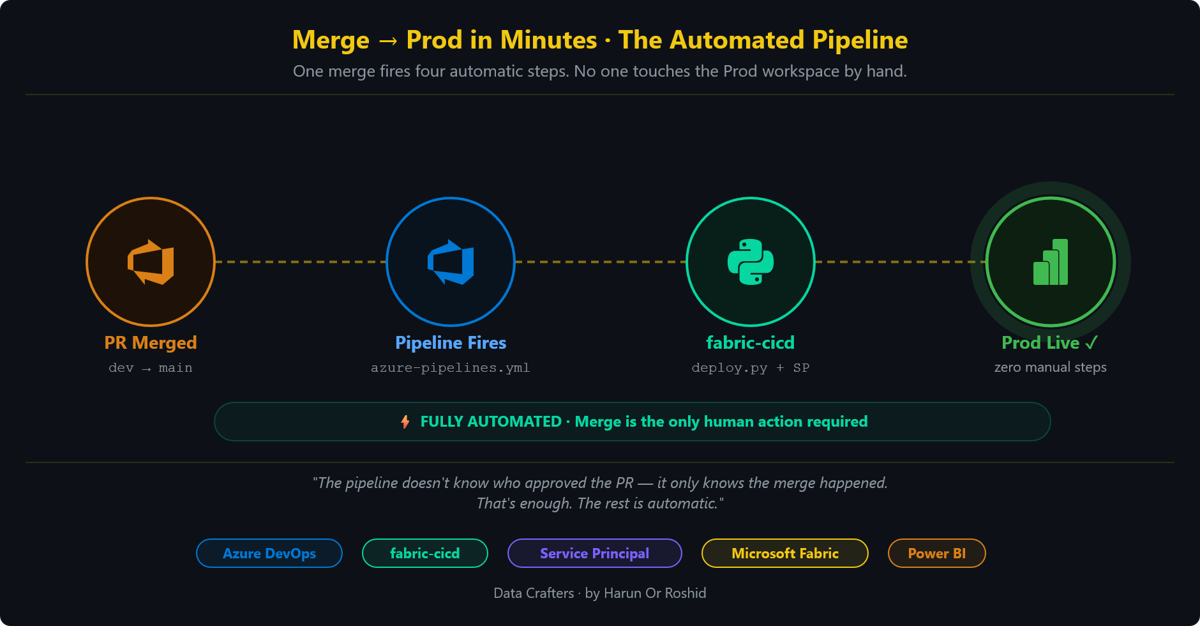
- The PR is merged into main, and the trigger fires.
- The pipeline spins up an agent and installs Python and fabric-cicd.
- It runs deploy.py, which authenticates as the Service Principal.
- fabric-cicd publishes the PBIP items into the Prod workspace.
- Prod is updated — done, with no manual steps.
Inside the deploy: fabric-cicd with a Service Principal
One file does the real work: `deploy.py`. It authenticates as the Service Principal and tells fabric-cicd what to publish and where — reading every value it needs from the environment variables the pipeline injects.
`deploy.py` — authenticate and publish.

# deploy.py

import os

from azure.identity import ClientSecretCredential

from fabric_cicd import FabricWorkspace, publish_all_items

# Authenticate as the Service Principal using secrets injected by the pipeline.

credential = ClientSecretCredential(

    tenant_id=os.environ["AZURE_TENANT_ID"],

    client_id=os.environ["AZURE_CLIENT_ID"],

    client_secret=os.environ["AZURE_CLIENT_SECRET"],

)

# Point fabric-cicd at the repo folder holding the PBIP items and the target workspace.

workspace = FabricWorkspace(

    workspace_id=os.environ["FABRIC_WORKSPACE_ID"],

    environment="PROD",                       # label for this deployment environment

    repository_directory="./workspace",       # folder where your PBIP items live in the repo

    item_type_in_scope=["SemanticModel", "Report"],

    token_credential=credential,

)

# Publish everything in scope to the Prod workspace.

publish_all_items(workspace)
Where the secrets come from. Notice deploy.py reads everything from environment variables — it contains no credentials of its own. The pipeline supplies them from the fabric-prod-cicd variable group you configured in the previous section, so nothing sensitive is ever written into the repo.
Watching it run. After a merge, open Pipelines in Azure DevOps to watch the run live. The logs show each step — install, authenticate, publish — and the Prod workspace reflects the new report within a couple of minutes.
Governance — approval gates & auditability
The real enterprise payoff isn’t just automation — it’s controlled with a paper trail. Our workflow delivers governance at two points:
- Reviewer approval on the pull request. Nothing reaches main (and therefore nothing deploys) without a human approving the change. The branch policy enforces it.
- A complete audit trail in Git. Every change is a committed with an author, a timestamp, and a message. You can answer who changed what, when, and why — and roll back to any previous state instantly.
For stricter environments, you can add an approval gate using Azure DevOps Environments: require a named approver to sign off inside the pipeline before the deploy step runs to Prod. That gives you a second, deployment-time checkpoint on top of the PR review.
A few governance habits worth adopting:
- Only the Dev (and feature) workspaces connect to Git. Prod receives content only through the DevOps pipeline — never direct edits — so the repo and the workspace never drift apart.
- Treat semantic model changes with the same care as report changes. They’re versioned and reviewed the same way; a model change rides through the same PR-and-deploy flow.
- Never edit Prod by hand. A manual fix in Prod is invisible to Git and will be overwritten on the next deployment. Fix it in dev, review, and let the pipeline carry it forward.
Conclusion & next steps
Look at what’s changed from where we started. There’s no more manual deployment from Dev to Prod: you commit your work to dev, open a pull request, and a teammate approves it. The merge triggers the pipeline; fabric-cicd deploys Prod as the Service Principal, and you’re done. If anything, ever looks wrong, the previous version is one Git to revert away — and every change has a name, a time, and a reason attached.
That’s the shift this workflow delivers:
- Version control — every change is tracked and reversible.
- Safe collaboration — branches and PRs instead of overwrites.
- Automated deployment — approved changes go live without manual republishing.
- Governance & auditability — review gates and a full history, end to end.
This really is the new normal for Power BI: the same disciplined, repeatable practices software teams have relied on for years, now within easy reach for BI developers.
Where to go from here:
- Add a UAT/Test stage between Dev and Prod for an extra validation step.
- Introduce automated testing of your semantic models (for example, with the Tabular/DAX testing tools) as a pipeline gate.
- Scale to multiple workspaces and teams using feature branches and per-environment parameters.
- Explore AI-assisted documentation and insight generation on top of your now-governed, version-controlled reports.